Flutter Android Studio Troubleshooting: Could not Compile Flutter to Android device

This error also known as:

  • Device selection on Android Studio is greyed out.
  • Not applicable for the “main.dart” configuration.
  • Could not connect to lockdownd, error code -13.

What’s the symptom?

You will see this issue when you’re trying to compile to your Android device via Android Studio, but for some strange reason, you no longer see your mobile device to the left of “main.dart” dropdown.

Yep, no longer you see the leftmost dropdown.

You’ll instinctly When you move your mouse toward the third dropdown (or in your case, the second dropdown since the leftmost isn’t there), and see a popup saying “Not applicable for the “main.dart” configuration, and it isn’t clickable (of course).

You can attach any number of devices, but the leftmost dropdown will still not be there.

Because the problem is not in your device. There’s actually something wrong with your project’s SDK configuration, which prevent Android Studio from recognizing entry point, or recognizing what framework it is.

Now I don’t know whether this issue also appears on pure Android app using Java/Kotlin, but I only encounter this on Flutter on Android Studio.

How to solve this?

Open menu File > Project Structure.

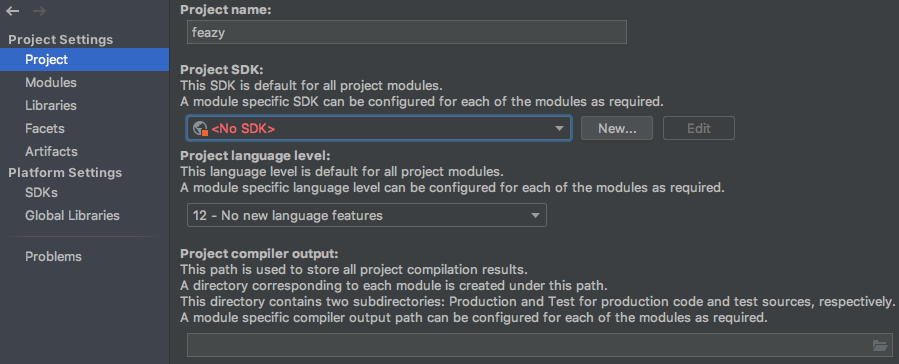
First, choose the Project menu under Project Settings. You’ll see settings about Project SDK. It should says Android API level. But sometimes, once in a blue moon, it can says “<NO SDK>”.

The obvious thing to do here is to click on the Project SDK dropdown, and select whichever latest SDK listed there.

Next, choose the Modules menu under Project Settings. You’ll see your modules listed on the second column.

Select any module, and then look on the third column, where it has three tabs: Sources, Paths, Dependencies. Choose Dependencies.

Now, once again, once in a blue moon, the Module SDK can suddenly select “<NO SDK>”. Choose the same latest SDK you choose on the Project settings, which in my case, is Android API 29 Platform.

Repeat this for every module you have on the second column.

If you have done, click OK to close the screen.

Now, the Android Studio will adjusting itself to the new settings, and you’re (hopefully) will see the device selection to the left of the “main.dart” dropdown, which will indicate that you now able to compile to the device selected.

Hope it helps! If you have any other issue, leave it in comment below and see if I can help you. Thanks!

Source: https://flutterforum.co/t/emulator-field-grayed-out-not-applicable-for-the-main-dart-configuration/317/9

Troubleshooting New Tablet Pen Pressure Not Working on Adobe Photoshop

Tablet pen is like the tools of the trade for digital artist nowadays. Every artist has their own tablet and brand preference. But if there’s one issue every artist at least encounter in their life, it is that their (probably new) tablet pen pressure is not working, especially on Adobe Photoshop. This can create a frustration, which was what happened to me. After some hair-pulling search, here are some steps to troubleshoot your digital tablet pen pressure.

1. Make sure the tablet pen register location at all.

This is the very basic of all. Tablet pen should be able to work right from the box when plugged in to your computer. When you use the pen to point and “click” at a location in the tablet, you should see the mouse cursor moving accordingly at your screen. If it isn’t, well, there’s some more serious, grave matter, might happen on your tablet. So, check out whether it has been plugged in correctly, make sure your computer’s USB port is not defect, make sure the tablet shows any sign of life (any light indicator turned on?).

2. Make sure you have installed the tablet’s driver.

This step is important. Computer usually can recognize tablet right from the bat as mouse replacement when plugged in without driver. But of course to recognize the pressure, it’s an entirely different story. This is why you need driver. Check whether your tablet came with driver CD, or search on the internet for downloadable driver for that tablet.

3. Make sure you have given the tablet’s driver a full access privilege.

Now, if you run the tablet driver app, it usually comes with a self-diagnose feature to detect the pen pressure. But, you need to give the driver full access privilege in order to detect pen tablet pressure. Because I troubleshoot mine in Mac, I only know the exact step in Mac. But I believe there’s Windows equivalent for this.

  1. Open System Preferences
  2. Open Security and Privacy
  3. Open tab Privacy
  4. Choose Accessibility from list on the left
  5. Find your tablet driver app name from the list on the right. If you can find it, continue to step 11. Otherwise, continue to step 6.
  6. Click on the lock button below to make changes. Enter your password.
  7. Press “+” button.
  8. Navigate to Application folder where you install the driver.
  9. Select the tablet driver application. Press “Open”.
  10. The tablet driver application will be listed.
  11. Make sure the checkmark next to the tablet driver application is checked (you might need to click on the lock button below to allow changes).
  12. After you have done, click the lock again to prevent more changes.

Now close and rerun the tablet driver app again to make sure everything works accordingly.

4. Make sure you have given Adobe Photoshop a full access privilege.

Eh? You need to give Photoshop full access privilege too?

Yes, it is. In fact, this is the step that has me looking up for hours trying to figure it out. Adobe Photoshop might not need full access to be able to work fine on its own, but in order to detect tablet pen pressure, you have to give it the same full access privilege, like what you’ve given to your tablet pen driver. If you’re troubleshooting other app than Photoshop, same basic thing applies. You have to give that app full access privilege in other for the app to receive the pen pressure information.

  1. Open System Preferences
  2. Open Security and Privacy
  3. Open tab Privacy
  4. Choose Accessibility from list on the left
  5. Find Adobe Photoshop app name from the list on the right. If you can find it, continue to step 11. Otherwise, continue to step 6.
  6. Click on the lock button below to make changes. Enter your password.
  7. Press “+” button.
  8. Navigate to Application folder where you install the Adobe Photoshop.
  9. Select the Adobe Photoshop application. Press “Open”.
  10. The Adobe Photoshop application will be listed.
  11. Make sure the checkmark next to the Adobe Photoshop application is checked (you might need to click on the lock button below to allow changes).
  12. After you have done, click the lock again to prevent more changes.

Now close and rerun the Adobe Photoshop app again to make sure everything works accordingly.

5. Try to install different tablet pen driver.

I didn’t need to do this in my case, but from what I’ve gathered, if you do still have any problem, you can try to install other tablet’s driver. Sometimes it can make up for the missing link. Don’t forget to give it a full access privilege after installing.

There it is, some troubleshooting step if your tablet pen pressure doesn’t work. I hope this post helps to solve your problem. If you still have some issue, ask away on the comment section, and I’ll try to help as much as I can. Thanks!

How to add “Application Entry Point” in Kotlin

Coming from iOS developer perspective, I’m accustomed with the fact that when I create new project, there’s this file/class called AppDelegate automatically created for me. Code inside AppDelegate function didFinishLaunchingWithOptions: is guaranteed to be run ahead first before any other code except global variable initializations. Putting code in the AppDelegate is crucial because you can just put code there without care about which ViewController class gets displayed as root.

When developing Kotlin, I missed this feature. Turns out, it exists, but it doesn’t created for you automatically. You have to make it yourself. Luckily, it’s not hard. Unluckily, if you don’t use it frequently, you may forget about this. When you do forget, sometimes searching on the internet for “Kotlin Application Entry” does not lead you to what you’re searching for. So, here I am, making this short note, to remind me and you visitors about this. Something like main(). But what I’m about to show you is not main(), but something similar.

I assume you already have created a new project for this, in Kotlin. But this is actually can be done in Java too.

1. Create the file

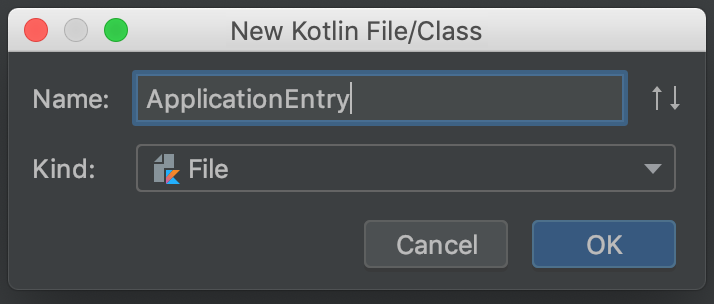
Switch the navigation into Android. Go to your project files, and create a new file. Name it whatever. I named it ApplicationEntry.

2. Create the class

The application entry class must be a descendant of class Application. Don’t forget to make necessary import by pressing CMD+Enter or CTRL+Enter.

import android.app.Application

class ApplicationEntry() : Application() {
    
}

3. Create the initializer block

Using this, you can treat the class like any other class. That means, you can add initializer block on the class, which guaranteed will get called before any other code in your app (well, except global variable initializations, of course).

import android.app.Application

class ApplicationEntry() : Application() {

init {
// put any initialization here
}

}

4. Reference this class in Android Manifest

Without referencing this class in Android Manifest, Android wouldn’t even know that this class need to be run first.

You’ll see something like this on your code editor.

<?xml version="1.0" encoding="utf-8"?>
<manifest xmlns:android="http://schemas.android.com/apk/res/android"
package="com.example.myapplication">

<application
android:allowBackup="true"
android:icon="@mipmap/ic_launcher"
android:label="@string/app_name"
android:roundIcon="@mipmap/ic_launcher_round"
android:supportsRtl="true"
android:theme="@style/AppTheme">
<activity
android:name=".MainActivity"
android:label="@string/app_name"
android:theme="@style/AppTheme.NoActionBar">
<intent-filter>
<action android:name="android.intent.action.MAIN"/>

<category android:name="android.intent.category.LAUNCHER"/>
</intent-filter>
</activity>
</application>

</manifest>

Add android:name=".ApplicationEntry" attribute to the application block, so it will looks like this: (make note of the dot sign before the name)

<?xml version="1.0" encoding="utf-8"?>
<manifest xmlns:android="http://schemas.android.com/apk/res/android"
          package="com.example.myapplication">

    <application
            android:allowBackup="true"
            android:icon="@mipmap/ic_launcher"
            android:label="@string/app_name"
            android:roundIcon="@mipmap/ic_launcher_round"
            android:supportsRtl="true"
            android:name=".ApplicationEntry"
            android:theme="@style/AppTheme">
        <activity
                android:name=".MainActivity"
                android:label="@string/app_name"
                android:theme="@style/AppTheme.NoActionBar">
            <intent-filter>
                <action android:name="android.intent.action.MAIN"/>

                <category android:name="android.intent.category.LAUNCHER"/>
            </intent-filter>
        </activity>
    </application>

</manifest>

The autocomplete will help you to accomplish this.

So that’s it. I know this is trivia, but if you’re new to Kotlin and Android programming, sometimes your search doesn’t lead you to what you’re searching for. Thus I hope you stumbled upon this article and end your endless quest.

Submit WordPress.org Site to Google Indexer Without Business Plan

As we know, Google removes Public URL Submission Tool last year. For change, they ask (force) website owner to use Google Search Console tool, which basically works the same, with some key differences:

  • You have to own the website. You cannot submit wild URL to Google anymore.
  • You actually have to submit XML sitemap to Google Index. You can’t just submit the root URL of your website anymore.
Continue reading

MPAndroidChart Explained in Kotlin

I am new to Kotlin and Android programming, and somehow I have a hard time to find a really basic MPAndroidChart plugin explanation. Finally, I found the tutorial from the plugin writer himself. You can read it here.

But I want to rewrite the tutorial from a different point of view, and hope that it can help you (especially all the Android dev beginners) to understand about the concept in a better flow.

Continue reading

GraphQL 101 Quick Start

GraphQL is the new database management from the Facebook team, which now outsourced. This article is a quick reference from what I’ve learned about it with autodidact. My article may miss some of the concepts as I can’t find a proper “for dummies” tutorial about GraphQL out there but should be sufficient for beginners as a stepping stone for more advanced concepts.

This GraphQL article is made using Graphcool as Server As A Service, and Apollo for the plugins. I’ll try to steer clear from a specific platform implementation, and just focused on GraphQL queries and mutations, as well as how to implement it in Apollo client. Feel free to skip over some steps if you’ve already done it.

Continue reading

iOS Swift Troubleshooting: Cannot Load Underlying Module For

alamofire import error

Symptom

You see an awesome cocoapod you want to include in your project. So you add a code to your podfile telling it to import the cocoapod, you run “pod install” on your terminal to begin the import process, and voila, the cocoapod now inserted to your project. But when you add the namespace “import framework” on top of your Swift file, Xcode said “Cannot Load Underlying Module For <Framework>”.

Continue reading

Tax Amnesty Dengan Serba-serbi Kasusnya

tax-amnesty

English reader: This article is talking about tax amnesty that, by the time this article is written, is currently ongoing on Indonesia. This article is written in Bahasa Indonesia. Thank you.


Oke, jadi ceritanya gua barusan ikut workshop tentang tax amnesty. Ngga ada rencana mau ikut sih sebenarnya. Tetapi ternyata memang dapet banyak informasi yang menurut gua cukup berguna sih tentang apa itu sebenarnya tax amnesty, dan tentang perpajakan Indonesia pada umumnya. Ternyata gua yang merasa kira-kira cukup mengetahui apa itu tax amnesty, waktu ikut workshop nya, baru sadar kalau yah walaupun perkiraan gua tentang apa itu tax amnesty itu ngga jauh-jauh amat, tetapi ternyata ada detil-detil yang penting yang tidak akan gua ketahui kalau ngga ikut workshop ini. Tadi coba browsing di internet tentang beberapa detil pun juga tidak bisa nemu.

Nah, gua kan hobi nyatet nih. Jadi di sini mau sharing aja sih apa-apa aja tadi yang sempat gua catet. Moga-moga bisa berguna juga buat temen-temen ya. Siapa tahu ada yang seperti gua, punya feeling tahu apa itu tax amnesty, tapi ternyata tidak tahu. Lol. Dan juga sempat nyatet beberapa kasus-kasus tax amnesty, yang mungkin menarik untuk dipelajari, kali aja ada yang punya kasus yang sama. Btw, karena ini notes, mungkin tulisannya agak tidak keruan. Jadi mohon dimaklumi, diambil intinya saja, oke? 😀

Continue reading

Bookmarks: How to Solve “Could Not Set Up iCloud Keychain” Issue

icloud-keychain-logo

Link: https://discussions.apple.com/thread/6985097

Apple was (is) notoriously eager to introduce yet another security layer for the iCloud. Yesterday, I was forced to change my iCloud password, which resulted in some login problem with all of my emails and built in social media accounts on my Mac, even though I have entered the correct password. So with the help of my friend, I decided to log my Mac out the iCloud, and then login back again. The log out process itself was a little bit complex in its own way, but finally I’m able to log out. Then I restart my Mac. After that, I log in my Mac again to the iCloud. The system then tried to activate iCloud features one by one. At the iCloud keychain section, iCloud sent an sms to a number that’s associated with my iCloud, which was a deactivated number. Crap. Trying to change the number itself gave me error “failed to change phone number”. I then tried to find some article to change that number, which I find it here: link.

Continue reading